Showing posts with label grammar. Show all posts

Tuesday, June 9, 2015

Back-to-School with Anchor Charts for the Artistically Challenged

Recently, I was putting together a nouns grammar resource, and I wanted to include some kind of anchor chart because I see all the beautiful ones on Pinterest all. the. time.  But whenever I try to actually draw one, it's a dismal failure.  The one I actually did make for nouns was really not helpful because the kids really had no idea what I drew.  Being the beginning of first grade, adding a label was not helpful for every child because not every child could read the label.


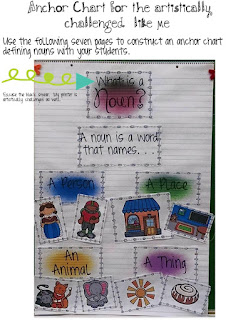
So, in the noun resource, I decided to include all the pieces necessary to construct an anchor chart with the children.  It is super simple to do.  First, print out the pieces, cut them out, and have them ready for the  lesson.  Then, gather the children around the chart paper.  Tell them today you are going to answer this question (glue on the question "What is a noun?"  Read the question to the children, then read it together.  As you say "A noun is a word that names..." glue on that phrase.  Then add the just the words in four spaces under the beginning phrase.  Be sure to leave space to glue the two pictures to the chart.  So you will glue on "a person", "a place," "an animal," "a thing" in different places on the chart.

Then you display the pictures of the nouns.  Have the children name each picture, then let them take turns putting the pictures under the correct definition of a noun.  When it is finished, it will looks something like this.

Please excuse the poor printing.  My inkjet printer was having "nearly out of ink" issues at the  time that I printed this out.

So, now you have built an attractive anchor chart with recognizable pictures that you will be proud to display in your classroom for your students to use as a reference.  Your children have gone through the process of building the chart with you, and they even had a chance to interact with the building of it, so hopefully the meaning of noun will be embedded for life so when they go to 2d grade, they don't give the 2d grade teacher the "deer in the headlights" look when she asks, "What is a noun?"  Instead, every hand will shoot up, and the 2d grade teacher will say, "Wow, your first grade teacher did a FANTASTIC job teaching you about nouns!"

Since the idea of an anchor chart is something you want to build with the kids each year, there are two ways to approach this.  You can either A.  Print out the pieces each year and build a new chart, or B. laminate the chart paper first, then add Velcro to the laminated chart and the back of the pieces.  That way you can remove the pieces and redo the chart each year.  Oh, I thought of C as well.  You could use foam board, add the Velcro, and make the chart on the foam board.  Which actually would be an awesome idea for me because then I could lean them against my walls since we're not allowed to hang anything on the new paint. (insert frowny face here).

Anyway, if you would like to try this anchor chart for yourself, you can click on the finished anchor chart picture below and download the pieces to experiment with over the summer.

 Anchor Charts for the Artistically Challenged


If you'd like to check out the larger Noun package that this came from, it's available in my TpT store.  Just click the preview below to get there, and be sure to download the free sample in my preview!


So there you have it!  I hope you find this idea useful.  I'm sure I'll be creating many more of these Anchor Charts for the Artistically Challenged, so keep your eyes open for them!

Have a great day!

Friday, August 1, 2014

Aloha August Sale Day 2 - Free & 50 Friday


What does Free & 50 mean?  Well, it means you are going to get a free sample from a product, and then you can get that product for 50% off when you fall in love with the sample!  Sweet deal, yes?  Yes!

For my Free and 50 offering, I'm trying to think ahead a bit and decided to put my Halloween  MegaPack on sale.  This fantastic resource is a bundle of two of my math-based centers that focus on relating addition and subtraction and practicing subtraction, and two of my language arts-based centers that focus on adjectives and nouns and verbs.  These are perfect for centers or small group work, with accompanying printables that you can use with the whole class.


To get your free sample from this resource, this adorable Old Mrs. Witch shape art project that goes along with my adjective resource, you need to click on the picture below and then click on the preview button.  From there, you can download the pieces to make this and the follow up adjective activity!

Be sure to type freefiftyfri in the search bar on TpT to find this and other great samples and 50% off resources!

If you haven't entered the rafflecopters for the 50 dollar TpT gift certificates  yet, be sure to do it now!

Please visit each rafflecopter and enter! 
Each one will generate a winner- and yes- you can win more than 1!

 
a Rafflecopter giveaway


Here is a clickable list of all the participating stores!

Tuesday, July 15, 2014

How Do You Use That? Grammar Goofs and Spelling Spoofs


UPDATE:  In this post I talk about how I use my Grammar Goofs and Spelling Spoofs resource.  If you would like to try before you buy, my August Grammar Goofs are a forever freebie.  Try them out by clicking the picture below!


Today, I want to share with you the story behind one of my resources, the why I made it and how I use it story.  In our reading series, there is a section called "Daily Proofreading Practice," where you put a few sentences on the board and the children fix the mistakes in them.  I was using the ones suggested in the teacher's manual, but they didn't make sense.  There would be two totally unrelated sentences, like these,

  Dad sate on the mat.  We like tew nap.

Well, that's nice, but what does dad sitting on the mat have to do with us napping?  So I started making up my own to put on the board.  Then I thought, hey, I can squeeze in some grammar practice as well with these.  So I started writing sentences with no capitals and no end marks.  Now, I had something that looks like this,
     
        the fat cat sat  the fat cat sat on the mat

With the advent of flippable and interactive notebooks, I designed a way to use these daily proofreading practices as part of my morning work time that would last for one week.  


After the first few weeks of doing them with the whole group of first graders, the children were easily able to transition into assembling the flippables on Monday, and then completing the work themselves in the morning. We check them together Monday - Thursday, and the kids make their own corrections to their work. I believe they learn more correcting their own work than if I correct them.  On Friday, I collect the booklets and check to see if they are applying the skills we practice.

I loosely follow the scope and sequence of skills laid out in our reading series.  These are designed as a progressive series, so each month, I put more errors in the proofreading for the children to find and correct.


Here's a sample of what the kids were correcting in March.


And this is a sample of the last page we did in early June.

By the last few months of school, the kids are able to correct mistakes in verb tenses, subject and verb agreement mistakes, i.e. June is instead of June are, as well as spelling errors. 


The design of the flippable allows them to easily refer back to the original sentence.  This is much better for some of my students who really have a hard time copying off the board.

So there you have it, the story behind my Daily Grammar and Spelling Practice:  Grammar Goofs and Spelling Spoofs.

I have every month completed from August through May.  August is free, September through May are $2.00 each.  Or you can purchase them money saving 10-month bundle for only $14,00!


Have a great day, everyone!

 
Blogging tips